Subscribe

How to create Dynamic Web Project Eclipse?


Share |

Dynamic Web Project is used to develop, debug and deploy dynamic web applications in eclipse. For this project you need to have Eclipse IDE for Java EE developers which can be downloaded from here

Note: for my tutorial I am using Eclipse 3.6 Java EE IDE.


Steps to create Dynamic Web Project in Eclipse.
Step 1: Launch Dynamic Web Project Wizard.

  • If you are in the Java EE perspective then you can simply do it form File menu by going to File -> New -> Dynamic Web Project

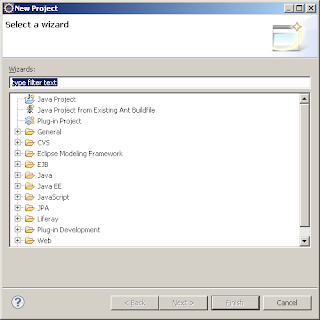
  • If you are in any other perspective and there is no direct option in File menu to create Dynamic Web Project then go to File -> New -> Project that will launch project selection wizard
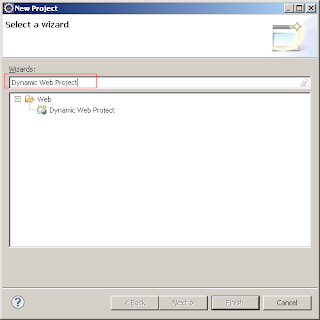
  • In this wizard select Dynamic Web Project under Web category and click Next 
  • That will show the Dynamic Web Project wizard as follows:
  • Enter the Project Name
  • Select the Target Runtime from the list if does not exist then add new target runtime by clicking New Runtime... button. Here from the list of the list of Runtime select your server's runtime e.g. I selected Apache Tomcat v6.0
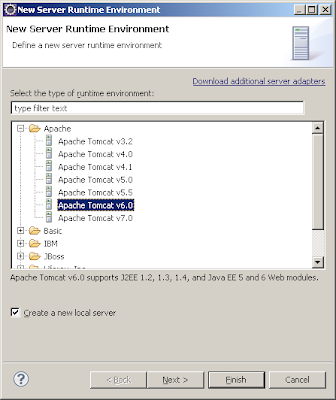
  •  Click next to specify the server configuration, where you can specify the name, location and JRE for the server runtime and click on Finish  button

  • Now you will come back to first page of the Dynamic Web Project  wizard. Here select Dynamic Web module version  to 2.4 or higher and leave all the other parameters as default values though you can change them as per your need
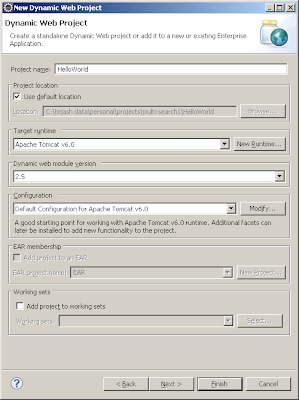
  •  Click on the Next button to configure source location and Default output folder similar to Java Project
  • By default source location would be src change that to WebContent/WEB-INF/src and by default the Default output folder would be build/classes change that to WebContent/WEB-INF/classes 

  • Then click on Next button to configure Web Module for Dynamic Web Project. Here you can configure Context root, Context Directory and select check box to Generate web.xml deployment descriptor

  • Now hit the finish button and Dynamic Web Project gets created with following structure
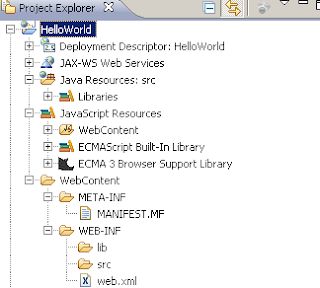
  • And the auto generated web.xml looks as follows:
    <?xml version="1.0" encoding="UTF-8"?>
    <web-app xmlns:xsi="http://www.w3.org/2001/XMLSchema-instance" xmlns="http://java.sun.com/xml/ns/javaee" xmlns:web="http://java.sun.com/xml/ns/javaee/web-app_2_5.xsd" xsi:schemaLocation="http://java.sun.com/xml/ns/javaee http://java.sun.com/xml/ns/javaee/web-app_2_5.xsd" id="WebApp_ID" version="2.5">
      <display-name>HelloWorld</display-name>
      <welcome-file-list>
        <welcome-file>index.html</welcome-file>
        <welcome-file>index.htm</welcome-file>
        <welcome-file>index.jsp</welcome-file>
        <welcome-file>default.html</welcome-file>
        <welcome-file>default.htm</welcome-file>
        <welcome-file>default.jsp</welcome-file>
      </welcome-file-list>
    </web-app>

    Now using this Dynamic Web Project you can create any dynamic web applications based on JSP, Servlet, Struts etc.

    Share |

    JSP Hello World


    Share |

    This sample code or example displays "hello world" in the browser using JSP

    JSP can be learned very easily. This is just the beginning to learn this exciting language. This simple page contains a JSP program and it outputs on browser in running state. This given program of JSP illustrates you how to print simple "Hello World!" string on the browser through the server side code (provided by JSP).

    This program also contains HTML (Hypertext Markup Language) code for designing the page and the contents. Following code of the program prints the string "Hello World!" by using <%="Hello World!" %> while you can also print the string by using out.println("Hello World!") in the <% and %> JSP tags.

    Here is the code of the program "hello.jsp":

    <html>
     <head><title>Hello World JSP Page.</title></head>
     <body>
      <font size="10"><%="Hello World!" %></font>
    
     </body>
    </html>
    

    Running or Executing hello.jsp

    Note You must install tomcat or any other web-server which supports JSP.
    Here I will explain how can you run hello.jsp using tomcat.
    - Put hello.jsp in the directory [tomcat install directory]/webapps/ROOT/
    - Then start tomcat server using [tomcat install directory]/bin/startup.bat on Windows platforms or [tomcat install directory]/bin/startup.sh on Unix or Linux platforms.
    - Now open you web-browser and open URL "http://localhost:8080/hello.jsp" and you can see "Hello World!" as output in your web-browser.

    Share |

    Java Servlet Hello World with Tomcat


    Share |

    Hello World Java Servlet Example , Tutorial or Sample Program

    This article will is for new-bee of Java Servlet. Here I will explain you how you can run your first hello world Servlet example on Tomcat.

    First download and install tomcat and JDK on your machine.

    Create following folder structure inside tomcat installation directory.
    [tomcat install directory]/webapps/hello
    [tomcat install directory]/webapps/hello/WEB-INF
    [tomcat install directory]/webapps/hello/WEB-INF/classes
    [tomcat install directory]/webapps/hello/WEB-INF/classes/test

    Now using any text based editor write following java code using any editor and save the file as HelloServlet.java at [tomcat install directory]/webapps/hello/WEB-INF/classes/test
    package test;
    
    import java.io.*;
    
    import javax.servlet.http.*;
    import javax.servlet.*;
    
    public class HelloServlet extends HttpServlet {
      public void doGet (HttpServletRequest req,
                         HttpServletResponse res)
        throws ServletException, IOException
      {
        PrintWriter out = res.getWriter();
    
        out.println("Hello, world!");
        out.close();
      }
    }
    
    After this go to command prompt and change directory to [tomcat install directory]/webapps/hello/WEB-INF/classesand give following command
    javac -cp .\..\..\..\..\lib\servlet-api.jar test\HelloServlet.java
    

    We should start understanding the servlets from the beginning. Lets start by making one program which will just print the "Hello World" on the browser. Each time the user visits this page it will display "Hello World" to the user.

    As we know that the our servlet extends the HttpServlet and overrides the doGet() method which it inherits from the HttpServlet class. The server invokes doGet() method whenever web server recieves the GET request from the servlet. The doGet() method takes two arguments first is HttpServletRequest object and the second one is HttpServletResponse object and this method throws the ServletException.

    Whenever the user sends the request to the server then server generates two obects, first is HttpServletRequest object and the second one is HttpServletResponse object. HttpServletRequest object represents the client's request and the HttpServletResponse represents the servlet's response.

    Inside the doGet(() method our servlet has first used the setContentType() method of the response object which sets the content type of the response to text/html. It is the standard MIME content type for the Html pages. After that it has used the method getWriter() of the response object to retrieve a PrintWriter object. To display the output on the browser we use the println() method of the PrintWriter class.

    Now configuring web.xml for deploying and running the Servlet. Create web.xml with following content at [tomcat install directory]/webapps/hello/WEB-INF directory
    <web-app version="2.4" xmlns:xsi="http://www.w3.org/2001/XMLSchema-instance" xmlns="http://java.sun.com/xml/ns/j2ee" xsi:schemalocation="http:/java.sun.com/dtd/web-app_2_3.dtd">
      <servlet>
        <servlet-name>hello</servlet-name>
        <servlet-class>test.HelloServlet</servlet-class>
      </servlet>
    
      <servlet-mapping>
        <servlet-name>hello</servlet-name>
        <url-pattern>/hello</url-pattern>
      </servlet-mapping>
    </web-app>
    

    Now just start tomcat server with default configuration and open following URL in your browser.

    http://localhost:8080/hello/hello

    You will see "Hello, world!" as an output in your browser.

    Note: Before starting tomcat make sure you have set JAVA_HOME environment variable point to installation directory of JDK.


    Explanation

    The servlet-mapping tells Resin that the URL /hello should invoke the hello-world servlet.
    The servlet tells Resin that hello-world uses the test.HelloWorld class and that the value of the greeting init parameter is Hello World.

    HelloWorld.java contains the actual servlet code. It just prints a trivial HTML page filled with the greeting specified in the web.xml.

    init() and destroy() are included mostly for illustration. Server will call init() when it starts the servlet and destroy before server destroys it.

    Share |

    Hot Topics

    My Headlines